Updated: April 02, 2022
If you are looking to create a beautiful weld, then there may be no better than if you used a TIG welding process. This type of welding process creates stunning looking welds that are easy to clean, but the process can be quite intimidating to a beginner.
Creating a weld using the TIG process demands that the welder know how to connect all the equipment properly to ensure that they are getting the best quality weld. There are also several elements that are necessary to understand to be able to be successful.Setting up the Weld
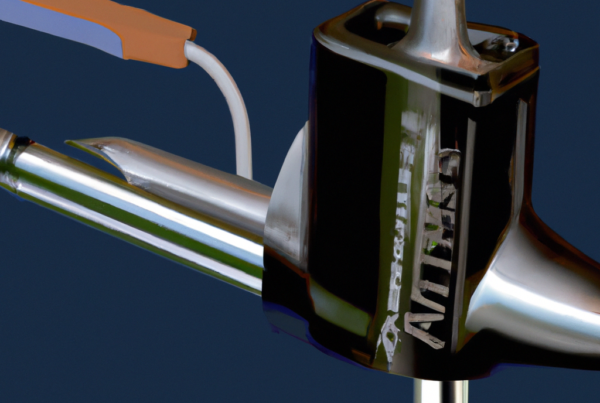
One of the best places to begin is by discussing the seven key components for setting up the TIG Weld. For those who are using an air-torch there should also be a special adapter located in the box. By plugging the torch into the front of the machine then connecting the gas outline, the coolant line is attached. Here are the six steps that need to be followed in the setup process:#1 Connect Your Remote Control
The first of these is to connect your remote control. To accomplish this task,you will need to plug in the foot pedal that came with the TIG welder. You may find that your model uses a fingertip control. That is perfectly okay. It is still the same principle involved. Once the controller is connected, and you will need to position to control that gives you the highest degree of comfort. This is important because you wanted to be easy to hold and control the torch and having the remote control and a position that is not natural will only hinder your success.#2 Connect Work Clamp
The next step be to connect the work clamp. To create a good TIG Weld, it is important to have your ground clamp properly connected to your equipment. To do so, you need to give yourself enough room so that the clamp is properly situated on the worktable or at the end of your project area.#3 Select Polarity
Your next step is to select the correct polarity. Making your selection is based upon the type of not all the time to work most often in project itself. For example, if you are using or creating an aluminum well, then you would set up the front panel for an AC current. For steel alloy or other types of steel welding, the DC setting is the best option. You will find that some TIG welders come with a stick option included. You may also find that there are two DC options that are available. They are DCEN and DCEP. When using the stick welding option, you must use the DCEP setting.#4 Shape the Tungsten Element
Next, you must shape the tungsten element so that it can be used for making the weld. This is accomplished by grinding the element to a point, always doing so in the long direction. The point should be about 2.5 times that of the diameter of the element. To help you to properly grind the element, you will need a grinding wheel of 200-grit or finer. You want to make sure that the point is flat. One common mistake that people make is that they use the grinding wheel for other types of projects. This reduces its effectiveness. Therefore, only use it for this specific task.#5 Find the Back of the Torch and Loosened
Your next step is to find the back of the torch and loosened. This allows you to remove the tungsten. From there, you then remove the nozzle and the copper collet. The collet and its body are then connected back to the torch and. You can also place the nozzle back onto the torch at this point. This makes it so that the tungsten that has been added to the collet will give you about 1/8 of an inch but no more than 1/4 of an inch.#6 Setting Up the Power Supply
The next step is critical. You need to connect your TIG welder to the power supply, ensuring that the power supply correctly matches the manufacturer’s standard for the equipment. Some of these welders are already supplied with the plot, meaning all you must do is plug it into a power receptacle and you are ready to go. However, you may find that there are some that require 240 V. If this is the case, there is likely a matching plug to help accommodate this need. You also want to make sure that the canister of gas is ready. This is done by connecting it to the regulator which is then connected to the gas valve. If a separate power supply is required for the coolant system this should be explained during the assembly process.Which Helmet Would You Recommend for Setting Up a Tig Welder?
When it comes to setting up a Tig welder, finding the right helmet is crucial for safety and precision. Opting for the best helmets for tig welding ensures protection from sparks, UV rays, and harmful fumes. Look for models that offer a clear view, adjustable fit, and reliable auto-darkening features to enhance visibility and ease of use. Invest in a high-quality helmet to make your Tig welding experience comfortable and secure.